
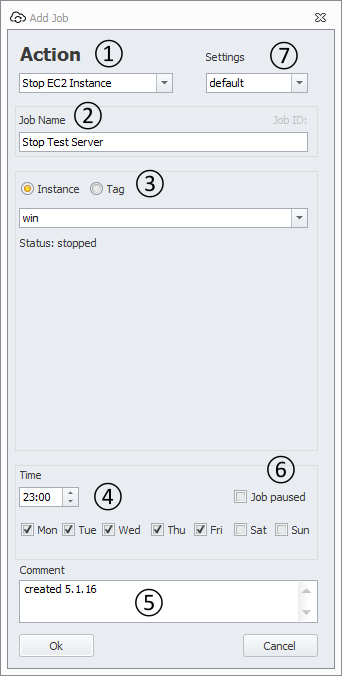
To create a job that stops an EC2 instance click the plus-sign on the toolbar.
Stop by instance ID
① With the “Action” combo box you choose the job type. To add a job that stops an EC2 instance please select “Stop EC2 Instance”
② The “Job Name” defines the name of a job. This name is shown in the job list, the job log and in mail notifications. Put a short description of the job in here.
③ Select the “Instance” radio button if you want to stop one single instance by its ID. You can also stop multiple instances by entering a tag. We will explain this later.
Select the EC2 instance you want to stop from the “Instances” combo box.
Stopping instances by TAG
③ Alternatively you can create a job that is stopping all instances that have a certain tag associated.
Select the “Tag” Radio button and enter the name of the tag in the “tag” field. Example “MyTag”
Open AWS Console and tag all the instances you want to stop with a key named “MyTag”.
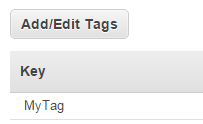
You can tag one or many instances with the tag “MyTag”. AutomatiCloud will stop all of them.
④ Now you can set up the schedule for your snapshot job. Tick the check box for every day you want to execute your job and enter the time to run your job.
⑤ The “Comment field” allows you to enter free text describing your job (date/time you created the job or last edit).
⑥ By ticking the “Pause” check box you can temporarily stop the execution of a job without deleting it.
⑦ The “Setting” combo box allows you to control under which set of parameters the job is executed. You will always have one “Default” setting. The Settings dialog allows you to create additional settings controlling AWS credentials, region and notification parameters.