
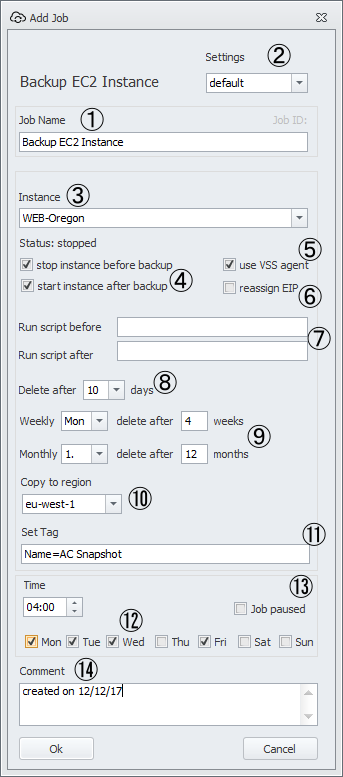
To backup an EC2 instance you create a new job by clicking the plus-sign on the toolbar and selecting “Add Backup EC2 Instance Job”.
This job type will create snapshots of all attached volumes. To create consistent snapshots you can stop the instance before backing up. For windows instances you can also integrate our VSS agent to create VSS snapshots.
If you need to stop services or applications you can trigger scripts that will be executed.
Backing up by selecting an instance volume
① The “Job Name” defines the name of a job. This name is shown in the job list, the job log and in mail notifications. Put a short description of the job in here.
② The “Settings” combo box allows you to control under which set of parameters the job is executed. You will always have one “Default” setting. The Settings dialog allows you to create additional settings controlling AWS credentials, region and notification parameters.
③ The “Instance” combo box shows you all your EC2 instances in the selected region. You can choose one to be backed up.
④ If you want to stop the instance before taking the snapshots you check this box. This is required to create consistent snapshots.
⑤ If you need to have consistent snapshots of your Windows volumes and can’t afford to stop the instance, you can install our Windows VSS Agent on the instance and check this box to trigger the agent every time a backup is created. (separate license required).
⑥ Instances the are still using the old Classic-VPC and have Elastic IPs EIP associated will loose their association when you stop and start them. If you check this box AutomatiCloud will reassign all EIPs after start/stop.
⑦Before and after taking snapshots AutomatiCloud can execute scripts on the selected instances. You have to enter the full path of the script.
For Windows: “C:\Scripts\stop_app.ps1”
For Linux “/var/scripts/stop_app.sh”
⑧You can define the retention period for your backups by selecting the number of days in the “Delete after x days” combo box. All snapshots that are older than the selected number of days will be deleted by the job. To achieve this, AutomatiCloud tags all the snapshots it creates with a tag that has the unique JOBID of the Job in its key field. This JOBID is used for the deletion of snapshots that are older than the configured rentention period.
AutomatiCloud will only delete snapshots that have a matching JOBID. It will never delete snapshots not created by itself.
The cleanup procedure is an integrated part of the snapshot job. This means that a weekly backup job will only look once a week for outdated snapshots and delete them when needed.
⑨ AutomatiCloud supports a Grandfather-Father-Sons backup schema. You define retention periods in three levels
- Daily
- Weekly
- Monthly
For each of these levels you can define how long the snapshots will be stored. Snapshots that are older than the defined period and belong to the matching level are deleted after job execution.
Example:
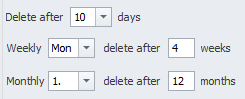
This job will keep 10 snapshots as daily snapshots. Every Monday it will create a weekly snapshot (no daily) and keep 4 of them. Every 1st weekly snapshot will be treated as monthly and kept for 12 months. After one year you will reach the maximum of 24 snapshots: 12 monthly, 3 weekly and 9 daily.
⑩ The “Copy to Region” combo box allows you to define a second region where snapshots are copied to. This gives you an additional level of security in case of a complete AWS region failure.
⑪ After snapshot creation is finished AutomatiCloud can assign one or more tags to the snapshot. The Key and Value of the tags can be controlled by filling out the “Set Tag” field.
You can add up to nine pairs of “key=value” separated by semicolon. Each “key=value” pair creates one snapshot tag. And you can use macros in your tag Definition that are expanded during Job execution.
Example:
“Name=AC Snapshot;Cust=Comtoso;SET=$DOW” will result in three tags:
- Tag 1: Key=Name, Value=AC Snapshot
- Tag 2: Key=Cust, Value=Comtoso
- Tag 3: Key=Set, Value=TUE (weekday of Job execution)
Available Macros:
- $DOW: Three letter day of week (MON)
- $DATE: Date (24.08.2015)
- $TIME: Time (22:00)
- $DAYOFWEEK: Day of week (Monday)
- $MOY: Month of year (JAN)
- $MONTHOFYEAR: Month of year (March)
- $MON: Month of year (03)
- $DOM: Day of month (24)
- $YEAR: Year (2015)
- $VOLID: Volume ID (vol-2343DEF)
- $VOLNAME: Name of the volume (Drive-C)
Macros are case-sensitve. “$TIME” is valid “$Time” is invalid. All macros are expanded during job execution not job definition.
⑫ Now you can set up the schedule for your snapshot job. Tick the check box for every day you want to execute your job and enter the time to run your job.
⑬ By ticking the “Pause” check box you can temporarily stop the execution of a job without deleting it.
⑭ The “Comment field” allows you to enter free text describing your job (date/time you created the job or last edit).